
When it comes to primary cell culture, a picture is worth a thousand words. A quality image can convey information on cell morphology, health, culture purity and density.
The following 3 types of 2-dimensional microscopy techniques can provide invaluable insight into your cultures when used concurrently.
1. Phase contrast microscopy
Phase contrast microscopy enhances contrast by translating cell thickness into levels of grayscale. Thicker regions of the cell, such as the nucleus, will appear darker compared to thinner regions of the cell, such as the cytoplasm. This technique is useful for assessing cell morphology and thus the purity of the culture. It can also indicate the health of the cells, as a darkened cytoplasm is sometimes an indication of damaged or dying cells. Figure 1 demonstrates how human endothelial cell, keratinocyte and fibroblast morphology differs using phase contrast microscopy.
2. Relief contrast microscopy
Relief contrast microscopy (also known as Hoffman modulation contrast) creates a shadowed pseudo-relief effect, which can also be used to assess cell morphology and purity of the culture. It is particularly useful for distinguishing between cell types that are more flat (such as fibroblasts) versus thicker, more rounded cells (such as epithelial cells), as shown in Figure 2.
3. Fluorescence microscopy
Fluorescence microscopy, in contrast, uses ultraviolet (UV) light and excitation/emission filters to selectively illuminate and visualise a fluorophore. It is used with cells expressing fluorescent proteins or with immunofluorescence, a technique where antibodies fluorescently tag a protein of interest. Immunofluorescence is used to label cell type-specific markers and is thus one of the best ways to assess the purity of a culture. The images in Figure 3 demonstrate how immunofluorescence identifies cell type and culture purity. The first image shows several beta-tubulin III positive neurons among two non-neuronal cells with dapi-positive nuclei (red arrows). The second HUVEC image shows an extremely pure culture, as seen by the ubiquitous staining of the endothelial cell maker CD31. The third image of human astrocytes is also very pure, as seen by widespread positive GFAP staining.
While these microscopy techniques yield slightly different types of information, using all three in combination is a great way to get the most information on your culture’s health and purity.
Tips for taking quality images
In order to obtain the best and most informative images with these techniques, consider these 3 basic elements: microscope configuration, focus, and exposure.
1. Microscope configuration
It is extremely important to understand your microscope. If you are new to the instrument, ask someone with experience to show you its proper use or read the instruction manual. Microscopes have many moving parts and it only takes one wrong setting to prevent you from taking a quality image. Understanding the different settings and correct light paths will also go a long way in troubleshooting future issues.
2. Focus
A crisp focus is the most important feature of a good image but can be tricky to achieve.
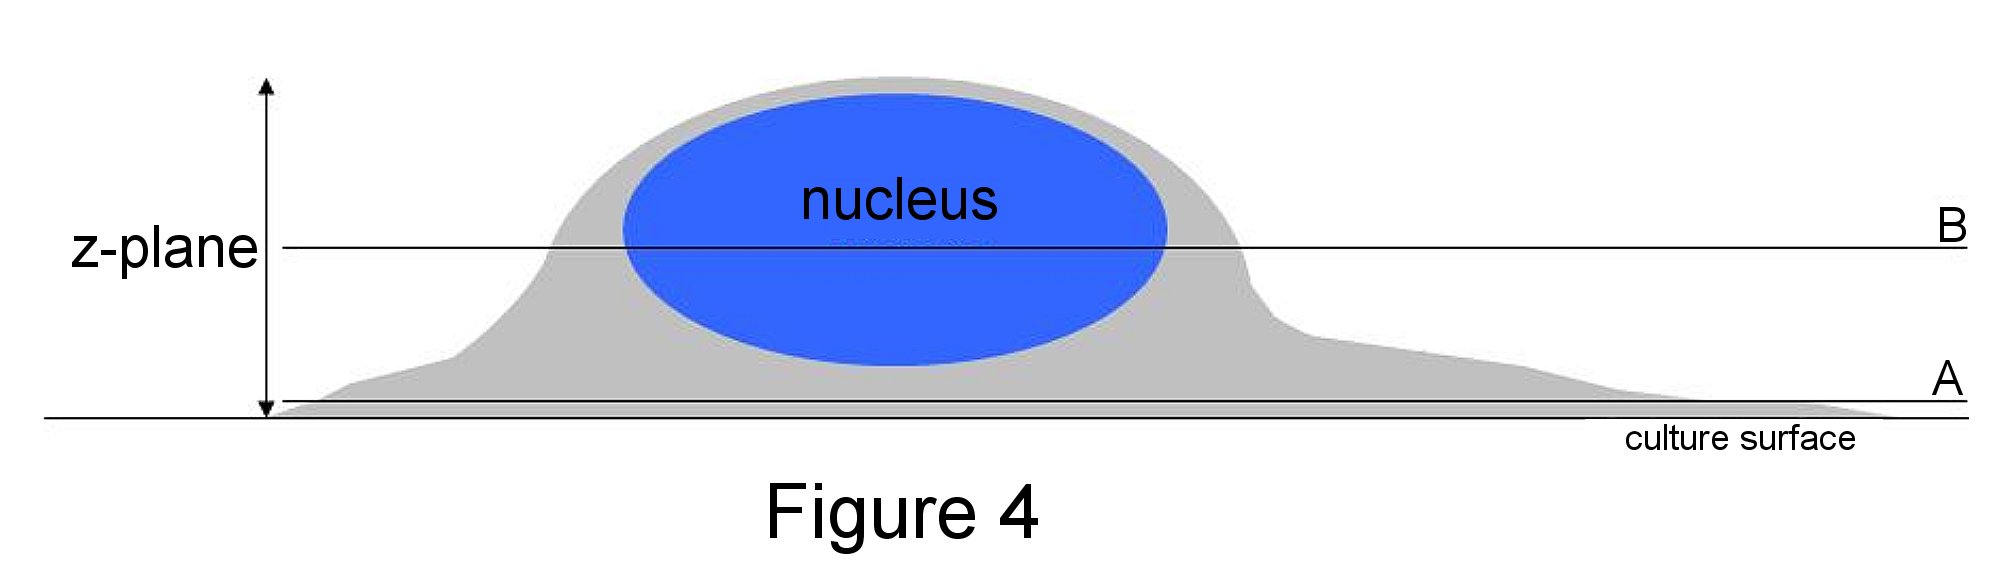
Although cells in vitro are generally grown on a 2-dimensional surface, cells are actually 3-dimensional. So which area of the cell should you focus on? For phase and relief contrast that use transmitted light to view the entire cell, you often want to focus down on the thinnest part (Figure 4A) and not up on the cell body (Figure 4B). In order to do this, look at the outermost perimeter of the cell and adjust the fine focus knob until that region is sharp. In fluorescent images, the focus for a nuclear stain (blue) may be higher in the z-pane than a cytoplasmic or adhesion protein. It is, therefore, crucial to re-focus with each colour to ensure the region of interest is sharp. This will guarantee a completely crisp image once the colours are merged.
3. Exposure
Exposure corresponds to how much light is captured in the image. Phase and relief contrast can be controlled by dimming the intensity of the transmitted lamp or adjusting the exposure time on your camera software. Too much exposure will result in saturation or bright areas with no variation in intensity (Figure 5). Too low exposure makes it difficult to visualise the cells (Figure 5).
Exposure is especially important for fluorescence imaging and is controlled by the image-capturing software. The goal is to acquire a strong signal without saturating the intensity (Figure 6). Imaging software can be used to adjust the contrast of an image and reduce background fluorescence but requires a reasonable signal at the beginning. Imaging software, however, cannot be used to eliminate saturation. It is also worth noting that you should not process an image too much so that it misrepresents the original.
In conclusion, taking high-quality images of your cells using multiple microscopy techniques is an invaluable way to document cell growth and gather data for your experiments. Producing high-quality images can be challenging at first, however, knowledge and practice can lead to success!
Originally posted by ScienCell on https://sciencellonline.com/blog/how-to-take-quality-microscopy-pictures/
Caltag Medsystems is the distributor of ScienCell products in the UK and Ireland. If you have any questions about these products, please contact us.